Saturday, January 28, 2012

Update Cheap Furniture: DIY Bookshelf and Furniture Revamp with Fabric

change cheap furniture with fabric weekend DIY

When it comes to furniture I'm extremely picky. I've lived in my house for 3 years before I bought a sofa. It's not because I'm dirt poor, I have saved money for one. It's not because there are no sofas for sale in my town, there are thousands. I just don't like any of them. I hate most traditional items unless its sacasum or painted a bright color. The Southern Country middle class that every furniture store seems to showcase is off putting. And don't get me started on Micro suede. Gross!!! I'd rather wait and slowly buy things I love then have a house full of cheap crap. =P

That being said I have a few pieces of cheap crap bought out of necessity. One being a cabinet from Target to put my CD's in. I've yet to jump on the download bandwagon. I like my music in disc form with a case and a slip of lyrics and pictures that the musicians can autograph.


I think the cabinet was $29.99 on sale and came in a flat box and you put it together yourself. It's pressed board...another cringe worthy phrase for me. It came in Black and Espresso. Espresso is a name given to dark brown furniture to get women to buy it. It's a beautiful marketing ploy. We love the word even if we don't drink coffee.

I went to Joann’s Fabrics with my 20% percent off coupon I printed from the Internet. Always check for these before you go. Most of the Fabric was already 30% to 60% off so double score. I was also covering some bookshelves...more about those a little later. I only found two fabrics I liked in the whole store (there's that pickiness again) so luckily I only needed two for my projects.


The Fabric I choose for the cabinet was in the Upholstery section and a bit thicker than the other. It was a bit loud but I wanted a print with teal and brown in it that wasn't a stripe, polka dot or floral and once you eliminate those there's not a whole lot left. Pink is not in my living room color scheme but it's a lead actress in my kitchen and bedroom. A little pink in the living room never hurt anyone.

I also bought a can of Medium spray adhesive since I was using a coupon. This stuff is amazing. I normally wouldn't blow $9.99 on a can of anything but I splurged when it was 20% off. =P

First I took the doors off the cabinet and measured the fabric to cover the front of the doors and wrap the edges. It's basically like wrapping a giant schoolbook. I heavily sprayed the fabric down and laid it on top of the door. I then quickly smoothed out from edge to edge so there weren't any air bubbles. I made holes where the handles attached simply buy pushing the screw in...then reattached the handles. Easy Peasy.

Fabric covered cabinet DIY furniture


recover furniture DIY furniture project

When I cut the fabric I did have the pattern continuously wrap the doors but somehow I ended up with one piece upside down. I was sure I triple checked this so was quite bummed to see that I'd somehow screwed it up. I lived with the Espresso for awhile before I decided it was too dark. I choose a metallic gold to lighten it up.

Paint and cover with fabric cheap Target furniture


In my office I have two $12.99 Target bookshelves that I loathe. They were left here by my old roommate. Since I have so much craft supplies though I need them or else all that stuff would be in a pile in the floor. This was the original reason I thought about covering the furniture. Once again they are the "Espresso" color.


I wanted a Fabric in a graphic print and preferably had turquoise in it. My style preference for the Office keeps shifting from Mad Men to India and back again. I lucked out and found a print that would work for either so I can put off that stressing me out decision again.


Since I was covering exposed edges I decided it would be cleanest to hem the fabric all the way around. This was very time consuming without a sewing machine. I used Fabric glue which has become a staple in my life. (OMG fixed all my work pant hems in about 5 minutes and its washable...genius)


I have my electric outlets on the outside of my walls since my house is cement. It's kind of a cool industrial look but it makes it hard to find a place for the bookshelves as there's only one place in the office that they can be flesh with the wall. That place is very inconvenient for the placement of my other office decor and computer. To solve this problem I removed the backs of the shelves so the outlet could just come through.


I used the fabric glue and the spray adhesive to attach the fabric to the bookshelves just like the cabinet. For now I'm leaving some of the "Espresso" and decided not to cover the whole thing. I haven't decided if I want to paint the exposed "wood" or leave it as is. Next I need to cover some of the shelving accessories. =)

decorate bookshelves with fabric

Let it Snow...after you turn it upside down.


I wanted to post this DIY before Christmas but alas I was making them as Christmas presents and couldn't risk that the lucky recipients might see them. ...and thus ruining Christmas for everyone...in the world.

But really, snowg lobes don't have to be only for Christmas. Falling snow does work better with a winter theme then say...a tropical scene but glitter works with all holidays and ALL themes. =)

Beforehand save your glass jars...you can buy them but why, when your refrigerator is probably full of glass jars and how many of those food items have expired? Clean them out and save them for this project. My favorite jar shape and size were from Trader Joe's Apple Butter (same jar for the equally as yummy Pumpkin Butter or tropical Mango Butter).

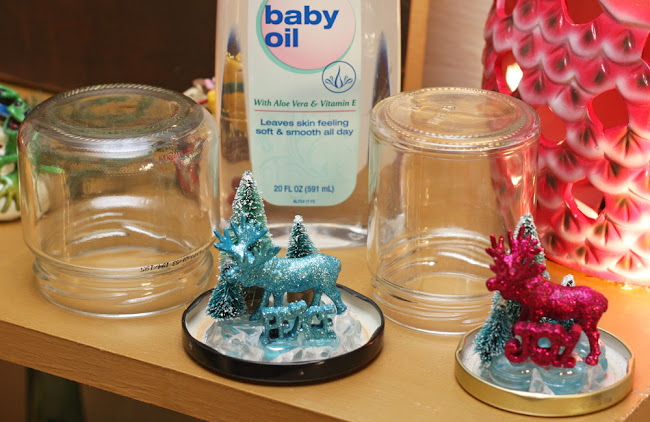
Next find some trinkets around the house...or find some at your hobby or toy store. The best place for tiny items are the places that carry dollhouse stuff. I found the christmas trees in this section of the hobby store. The Mooses were plastic toys in a misc. animal package and the words were Christmas ornaments made for a tiny tree.

Next you need to paint and seal or just seal your items. Remember they will be living in water and oil from this point on.


Here are the supplies I used for this project.

Next is optional but recommended as glitter almost always is...
I HIGHLY recommend "Glue for Glitter". It's sensational and very easy. Just spray the item you'd like to glitterfy, then roll or shower in glitter.


After it's covered in a adequate amount of glitter then spray another coat to seal it. Let it dry then spray it again.


Next you need to create your scene. Grab the lid of your jar...make sure it screws on good and doesn't leak by filling it with water and testing it out. Now you will be gluing your trinkets to the inside of the lid. Be careful not to let your items get too close to the edges or you won't be able to put the jar back on...I found this out after I'd already created my scene and had to start over so learn from my mistakes people.
I found glass or plastic aquarim rocks to be perfect for the base.


A base is very important. If you simply glue your item to the lid then depending on the shape of your jar a lot of your item will be hidden by the sides of the lid. Another gem of wisdom I pass on to you. =)


After you have crafted your scene and everything is in place....spray the whole thing down with a waterproof sealant. Let it dry then spray it again, let it dry then do it again.


Next you will create your snow globe. There are different "water" substances you can use. After reading about all the different concoctions and measurements, I threw them all out the window and just used Baby Oil. Its thick and clear and works perfectly. Fill the jar up almost all the way and pour in your glitter or fake snow.

I poured baby oil over my scene before I put it in the jar to get rid of any hidden air. When you put in your scene into the jar there will be overflow so make sure you have it one a surface in the bathroom or kitchen. If there isn't spillage you may not have enough oil in your jar. If it isn't filled up all the way you will have air bubbles. After you are sure there is enough oil you can then seal the lid if you wish.

Since I took these to my friends right after the last step for some reason I don't have a great picture of the finished one. haha. This is embarrassing...so just image this scene in glitter snow.


Ideas: Did you save your cake topper from your wedding? Put it in a snowglobe! =)

Sunday, January 22, 2012

BRAINS!!! Living Dead in Zombieland (Franklin)


Halloween fell on a Monday, so for the weekday, "A" and I were Batman and Robin. But on the weekend we were the undead. Every year our little town puts on Pumpkinfest and about 5,000 people flood the closed streets of downtown Franklin. We hope that most will be in costume but unfortunately its closer to 35% and 25% of those are children...and dogs.
 

Did their parents not read the part about the "poison" apple? Or perhaps they are being ironic...if so, nice.


Who doesn't love a labrodoodle...who doesn't love to say the word, Labrodoodle? But a Labrodoodle in a tux..its almost so cute its obnoxious.


Our thrift and closet shopping experience for superheroes was so fruitful we went back for Zombie attire. "A" was going to be a Prom Queen Zombie and me a Catholic schoolgirl Zombie. "Our Thrift Store" provided me with an authentic catholic schoolgirl skort for $0.25 and I found a tie in the matching colors for $1.99. I also found a navy cableknit sweater there too. I'd wanted a cardigan but when I didn't find one in the color I wanted I decided I could just cut down the middle of a regular sweater. I had an old white button shirt I was about to donate to Goodwill so I fished it out of the box in my trunk. The white knee-highs were $1.99 at target and I already had the Mary Janes...once again...a girl shoe staple.
 

Being almost as pale as a Zombie I already owned pale makeup and I had even paler makeup from trial and error makeup shopping. All I needed was fake blood. And Red food coloring worked just fine.

"A" came over to my house early so we could get zombiefied together. I poured red food coloring on my hands and grabbed at my white shirt and socks while yelling "brains!!". I ripped up my sweater and skirt. I hoped no one driving by saw some of what was going on and called the police. Taken out of contence I guess it was a little gruesome.

After our makeup deadified us a little and enough blood was shed, we posied for pictures.


We walked to Pumpkinfest and decided to get chili at the chili cook-off first before it was all gone. Normally Zombies only eat brains but a little known fact...Zombies also love Chili...and Fritos.


A stop at the Catholic Church's chili booth and one of the Fathers commented that I looked so familiar. =P I love when religious people say something humorous and totally unexpected. Their chili however needed some work. The Holy water was not a great secrete ingredient.


After walking the loop a few times and checking out other peoples lame and or store bought costumes we decided it was time for a Zombie photo shoot and headed over to the cemetery.


"You're a great friend, but if the Zombies attack, I'm tripping you."


"Zombies were people too."


"Zombies HATE fast food"


Back to school...to get a big brain.


Death LOVED us.

Holy DIY Batman!

Vintage Batman Robin DIY costumes handmade Halloween costumes
Halloween and the workplace is a very tricky thing. It almost requires a DIY costume as anything store bought requires a stripper pole accessory...and those are sometimes a pain to carry around the office.
My office partner in crime who sits in the cubicle next to me shared my dilemma and we decided to go with a theme. We threw around various ideas before deciding on Superheroes. What's nice about Superheroes is there's a multitude of choices and variations...comic book, movie, cartoons. "A" decided to be Batman and I was going to be Catwoman but wanted to wear bright colors. I'm so over Black. I'd already been Poison Ivy one year back when I had bright red hair...hmmmm....what about Robin?

And what about 1960's Batman and Robin? ZAP! BAM!
Same Bat time same Bat channel.
We decided to raid our closets and thrift stores to make upcycled costumes...that and we're both flat broke.
We scoured the racks of Our Thrift Store in Franklin and Goodwill.

A" managed to find her Batman pieces for under $15.

I found a bright yellow tab top curtain at Goodwill for $3, which provided the perfect cape. A red sweater vest also a steal at $1.99.

thrift store shopping DIY Halloween costume
Off to the CRaft store I found stiff felt and cut out a R and oval then hot glued them together. I made a small one for my vest and a large one for the back of my cape.

I already owned a bright green tennis skirt and like every woman, a pair of tall black boots was housed in my closet.
Masks are not allowed at work so I faked it with green eyeshadow and a black eye liner and attempted a DIY on the Black Swan's makeup that I watched on YouTube.

Robin Halloween costume DIY handmade thrift store upcycle

Work was a blast, I was convinced costumes should be wore at least once a month. Sure there were occasional people who asked who I was…I decided they had a sad childhood and not to take it personally. Cops loved it. I asked if they needed any help fighting crime today. One laughed and said, “well…actually, Yes we do!”. For the day we took down our real name tags and made some for our Alter Egos..


After work I set my camera on a tripod. set the timer and we saved the downtown area from the threat of evil. Sometimes the photo shoot is the best part.

Just try to break into this vault would be criminals!
Batman and Robin 1960s DIY costumes handmade


Sometimes even the Batmobile breaks down. Thank Holy Trusted Local Transit System!

Batman and Robin Halloween costumes DIY office at work


Robin: "That's an impossible shot, Batman."
Batman: "That's a negative attitude, Robin."


"Holy strawberries Batman! We're in a jam!" Robin


Robin: "Ghoti" is "fish"?
Batman: See here. English phonetics. GH becomes F, as in "tough" or "laugh". O becomes I as in "women". TI becomes SH as in "ration" or the word "nation".
Robin: Holy semantics, Batman. You never cease to amaze me!
Batman: No time for compliments, Robin. We must thwart some criminals. To the Batmobile!


Robin: "Boy! That was our closest call ever! I have to admit that I was pretty scared!"
Batman: "I wasn't scared in the least."
Robin: "Not at all?"
Batman: "Haven't you noticed how we always escape the vicious ensnarements of our enemies?"
Robin: "Yeah, because we're smarter than they are!"
Batman: "I like to think it's because our hearts are pure."


"Whatever is fair in love and war is also fair in crimefighting." - Batman


Years later when I revised the costume, while working in Nashville near the Batman building.