Saturday, January 28, 2012
Let it Snow...after you turn it upside down.
I wanted to post this DIY before Christmas but alas I was making them as Christmas presents and couldn't risk that the lucky recipients might see them. ...and thus ruining Christmas for everyone...in the world.
But really, snowg lobes don't have to be only for Christmas. Falling snow does work better with a winter theme then say...a tropical scene but glitter works with all holidays and ALL themes. =)
Beforehand save your glass jars...you can buy them but why, when your refrigerator is probably full of glass jars and how many of those food items have expired? Clean them out and save them for this project. My favorite jar shape and size were from Trader Joe's Apple Butter (same jar for the equally as yummy Pumpkin Butter or tropical Mango Butter).
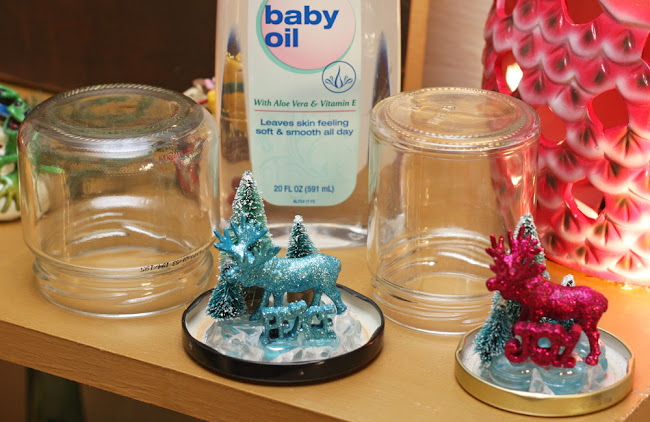
Next find some trinkets around the house...or find some at your hobby or toy store. The best place for tiny items are the places that carry dollhouse stuff. I found the christmas trees in this section of the hobby store. The Mooses were plastic toys in a misc. animal package and the words were Christmas ornaments made for a tiny tree.
Next you need to paint and seal or just seal your items. Remember they will be living in water and oil from this point on.
Here are the supplies I used for this project.
Next is optional but recommended as glitter almost always is...
I HIGHLY recommend "Glue for Glitter". It's sensational and very easy. Just spray the item you'd like to glitterfy, then roll or shower in glitter.
After it's covered in a adequate amount of glitter then spray another coat to seal it. Let it dry then spray it again.
Next you need to create your scene. Grab the lid of your jar...make sure it screws on good and doesn't leak by filling it with water and testing it out. Now you will be gluing your trinkets to the inside of the lid. Be careful not to let your items get too close to the edges or you won't be able to put the jar back on...I found this out after I'd already created my scene and had to start over so learn from my mistakes people.
I found glass or plastic aquarim rocks to be perfect for the base.
A base is very important. If you simply glue your item to the lid then depending on the shape of your jar a lot of your item will be hidden by the sides of the lid. Another gem of wisdom I pass on to you. =)
After you have crafted your scene and everything is in place....spray the whole thing down with a waterproof sealant. Let it dry then spray it again, let it dry then do it again.
Next you will create your snow globe. There are different "water" substances you can use. After reading about all the different concoctions and measurements, I threw them all out the window and just used Baby Oil. Its thick and clear and works perfectly. Fill the jar up almost all the way and pour in your glitter or fake snow.
I poured baby oil over my scene before I put it in the jar to get rid of any hidden air. When you put in your scene into the jar there will be overflow so make sure you have it one a surface in the bathroom or kitchen. If there isn't spillage you may not have enough oil in your jar. If it isn't filled up all the way you will have air bubbles. After you are sure there is enough oil you can then seal the lid if you wish.
Since I took these to my friends right after the last step for some reason I don't have a great picture of the finished one. haha. This is embarrassing...so just image this scene in glitter snow.
Ideas: Did you save your cake topper from your wedding? Put it in a snowglobe! =)
Subscribe to:
Post Comments (Atom)


No comments:
Post a Comment